Constructions and Tilings Class 7 Solutions RBSE Maths Ganita Prakash Part 2 Chapter 6
PracticingGanita Prakash Class 7 Solutionsand RBSE Class 7 Maths Part 2 Chapter 6 Constructions and Tilings Solutions Question Answer helps develop logical thinking and accuracy.
Ganita Prakash Class 7 Part 2 Chapter 6 Solutions
Class 7 Ganita Prakash Part 2 Chapter 6 Solutions
RBSE Class 7 Maths Ganita Prakash Part 2 Chapter 6 Solutions
In-text Questions
Page 137
Question 1.
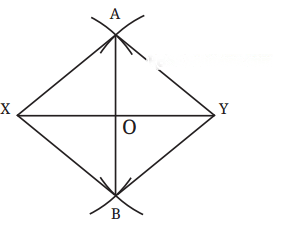
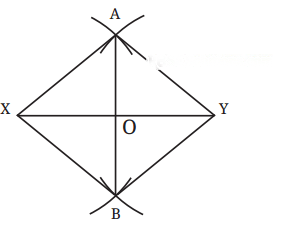
Will the line joining the two points at which the arcs meet, above and below XY always be the perpendicular bisector of XY, i.e., when XY is of any length, and the arcs are drawn using a radius of any length?
Solution:
Yes, it is always true for any line segment and the arcs drawn using a radius of any length.
This can be proved using congruence of triangles.
Question 2.
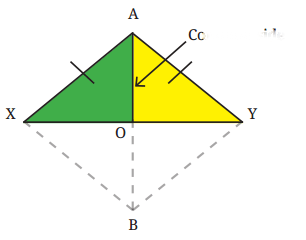
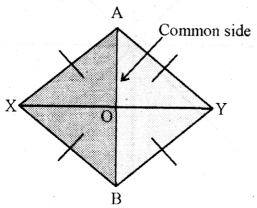
Which two triangles should be congruent for AB to be the perpendicular bisector of XY (that is, O is the midpoint of XY and AB is perpendicular to XY)?
Solution:
If we show that ∆AOX ≅ ∆AOY, then OX = OY, and ∠AOX = ∠AOY because they are corresponding parts of congruent triangles.
Since, ∠AOX and ∠AOY together form a straight angle, we have ∠AOX + ∠AOY = 180°.
Thus, ∠AOX = ∠AOY = 90°. This establishes that O is the midpoint of XY and AB is perpendicular to XY.
In ∆AOX and ∆AOY, we already know that AX = AY, and AO is common to both triangles. If we can show that ∠XAO = ∠YAO then, by the SAS congruence condition, we can conclude that the triangles are congruent.
To show this, we observe that ∆ABX ≅ ∆ABY. This is so because AX = AY, BX = BY, and AB is common to both the triangles. Thus, we have ∠XAB – ∠YAB, or ∠XAO = ∠YAO because they are corresponding parts of congruent triangles.
Hence, AB is the perpendicular bisector of XY
Pages 138-139
Question 1.
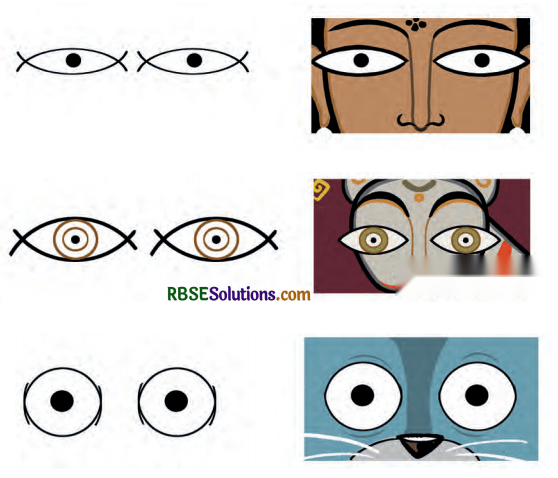
We can have eyes of different shapes.
How do we get these different shapes?
Solution:
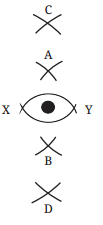
We can get the eyes of different shapes by drawing the arcs of different lengths as shown in the figure below.
In this the points C and D are such that CX = CY = DX = DY. An eye of a different shape can be drawn using these points.
Question 2.
Will C and D lie on the perpendicular bisector AB (See figure in above question)?
Solution:
The points C and D are at the same distance from both X and Y. We have just seen that joining any two such points givesthe perpendicular bisector of XY. Since XY has only one perpendicular bisector, which is the line AB, the points C and D must lie on the line AB.
Question 3.
Justify the following statement using the facts that we have established.
“Any point that has the same distance from X and Y lies on the perpendicular bisector of XY.”
Solution:
The perpendicular bisector of a line segment is the set (locus) of all points that are equidistant from the two endpoints of the segment.
Since point P has the same distance from X’ and Y (i.e., PX = PY), it satisfies this property. Therefore, point P must lie on the perpendicular bisector of XY.
Page 141
Question 1.
Can we extend the method of constructing the perpendicular bisector to construct a 90° angle at any point on a line?
Solution:
Yes, we can do so. Draw a line and mark a point O on it. Construct a 90° angle at point O.

- Extend the line on either side of O.
- Using a compass, mark two points X and Y at equal distance from O, so that O is the midpoint of XY.
- The perpendicular bisector of XY will pass through O and is perpendicular to the given line.
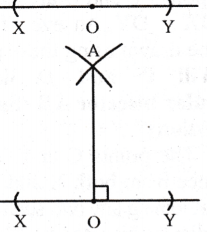
Question 2.
In this case, do we need to draw two pairs of intersecting arcs to get the perpendicular bisector of XY?
Solution:
No, we don’t. We already have one point, O, lying on the perpendicular bisector.
We only need to construct one pair of arcs (either above or below the line) from X and Y to get another point on the perpendicular bisector.
Page 143
Question 1.
How do we construct this figure?
Solution:
The supporting lines for this figure will look like a star with 8 equally spaced lines radiating from a center. It is constructed by taking the help of this figure.
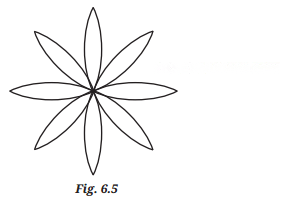
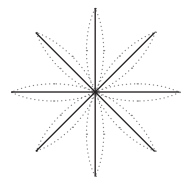
Question 2.
What is the angle between two adjacent lines (in the above figure)?
Solution:
We need the angle between every pair of adjacent lines to be equal. Since, 360° is equally divided into 8 parts, every angle is 45°.
Question 3.
How do we construct a 45° angle using only a ruler and a compass?
Solution:
We know how to construct a 90° angle. If we can divide it into two equal parts, or bisect it, then we get a 45° angle.
Page 144
Question 1.
How do we construct these congruent triangles, given the angle?
Solution:
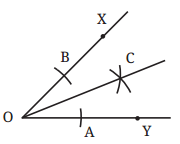
If A and B are marked such that OA = OB, and if C is chosen such that BC = AC, then by the SSS congruence condition, ∆OBC ≅ ∆OAC.
STEPS FOR ANGLE BISECTION
- Mark points A and B such that OA = OB.
- Choosing any sufficiently long radius, cut arcs from A and B, keeping the radius same. Mark the point of intersection as C
- OC bisects ∠AOB.
Page 149
Question 1.
Have you seen this kind of beautiful arch?
Solution:
Examples: Diwan-i-Aam at Red Fort (Delhi), Central Park (New York City).
Question 2.
How did they make these arches?
Solution:
The first step is to be able to draw them on a plane surface such as paper or stone.
Question 3.
Construct this arch shape on a piece of paper.
Solution:
Let us think about the support lines this figure will need.
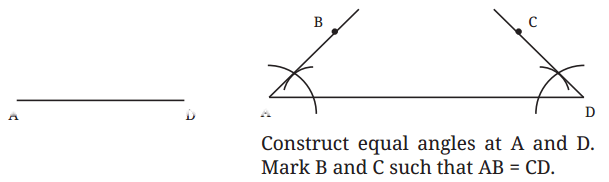
For symmetry, we should have AB = CD, and
∠BAD = ∠CDA.
Construct equal angles at A and D. Mark B and C such that AB = CD.
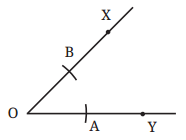
Question 4.
How would you construct these support lines?
Solution:
Steps :
- Draw a horizontal line AD.
- Construct equal angles at A and D (using angle copying or angle construction methods).
- Mark B and C such that AB = CD.
- Use these support lines to construct an arch by drawing arcs from appropriate centres.
- If required, adjust the radii of the arcs to make the arch look more aesthetically pleasing.
Page 150
Question 1.
What supporting lines will you use to draw this arch?
Solution:
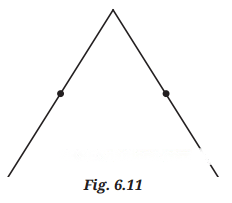
The supporting lines are just two line segments of equal length.
Question 2.
If their midpoints are marked, will you be able to construct a pointed arch?
Solution:
- Yes, mark the midpoints of two equal line segments placed side by side.
- Draw arcs from these midpoints to create the pointed arch shape.
Page 151
Question 1.
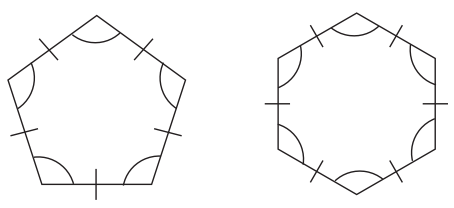
How do we construct a regular pentagon (5-sided figure) and a regular hexagon (6-sided figure)?
Solution:
To begin with, try to construct a pentagon and hexagon with equal sidelengths.
Question 2.
Can we break a regular hexagon into smaller pieces that can be constructed?
Solution:
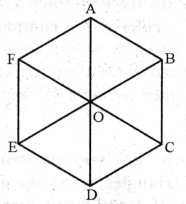
Yes, a regular hexagon can be broken into six congruent equilateral triangles.
- Join the centre of the hexagon to all its vertices.
- This divides the hexagon into six equal triangles.
- Each triangle has all sides equal and can be easily constructed using a compass and ruler.
Page 152
Question 1.
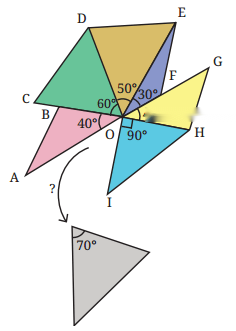
Consider this figure. Will the 70° angle fit into the gap? What is the gap angle ∠AOI?
Solution:
We have : 40° + 60° + 50° + 30° + 40° + 90° + gap angle = 360°.
Gap angle = 360° – (40° + 60° + 50° + 30° + 40° + 90°) = 360° – 310° = 50°.
So the 70° angle will not fit the gap (since the gap is only 50°).
Question 2.
In Fig. can you explain why AOD, BOE and COF are straight lines?
Solution:
Since the six equilateral triangles are arranged symmetrically around point O, the opposite vertices form straight lines through O. Each pair of opposite triangles forms a 180° angle at O, making AOD, BOE, and COF straight lines.
Question 3.
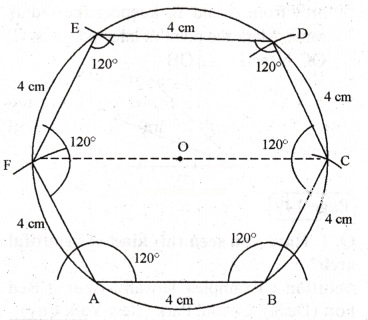
Construct a regular hexagon with a sidelength 4 cm using a ruler and a compass.
Solution:
We can construct a regular hexagon more directly if we can construct a 120° angle using a ruler and a compass.
Page 153
Question 1.
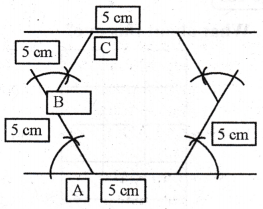
Construct a regular hexagon of sidelength 5 cm.
Solution:
- Draw a line segment AB = 5 cm.
- At A, construct a 60° angle using the method above.
- Mark AF = 5 cm on the new line.
- At B, construct a 60° angle on the other side.
- Mark BC = 5 cm.
- Continue this process to construct all six sides, each of 5 cm, with 60° angles between adjacent sides.
- The six vertices form a regular hexagon.
Page 154
Question 1.
How will you construct 30° and 15° angles?
Solution:
- Construct a 60° angle, then bisect it to get 30°.
- Bisect the 30° angle to get 15°.
Question 2.
Construct the following 6-pointed star. Note that it has a rotational symmetry.
Solution:
The steps followed are :
- Construct a regular hexagon.
- Extend alternate sides of the hexagon to form equilateral triangles pointing outward.
- This creates a 6-pointed star.
Question 3.
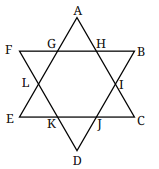
Are the six triangles forming the 6 points of the star — ∆AGH, ∆BHI, ∆CIJ, ∆DJK, ∆ELK, ∆FLG – equilateral? Why?
Solution:
Yes, they are equilateral.
Page 157
Question 1.
Can a 4 × 7 grid be tiled using 2 × 1 tiles?
Solution:
A 4 × 7 grid has 4 × 7 = 28 unit squares.
Each 2 × 1 tile covers 2 unit squares.
Number of tiles needed = 28 ÷ 2 = 14 tiles.
Since 28 is even, a 4 × 7 grid can be tiled using 2 × 1 tiles.
Question 2.
What about a 5 × 7 grid? Complete the justification.
Solution:
A 5 × 7 grid has 5 × 7 = 35 unit squares.
To tile this grid using 2 × 1 tiles, we need each tile to cover exactly 2 unit squares.
Since 35 is odd, it is impossible to tile a 5 × 7 grid using 2 × 1 tiles (because 35 cannot be evenly divided by 2).
Page 158
Question 1.
Is m × n grid tileable with 2 × 1 tiles, if one of m and n is even and the other is odd? If yes, come up with a general strategy to tile it.
Solution:
Yes, if one of m or n is even, then m × n is even.
General strategy : If m is even, use vertical tiles to cover all columns. If n is even, use horizontal tiles to cover all rows.
Question 2.
Is an m × n grid tileable with 2×1 tiles, if both m and n are odd? Give reasons.
Solution:
No, if both m and n are odd, then m × n is odd.
Since each tile covers 2 unit squares, we need an even number of unit squares to tile the grid.
Therefore, a grid with an odd number of unit squares cannot be tiled using 2 × 1 tiles.
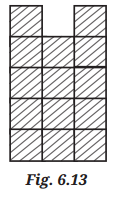
Question 3.
Here is a 5 × 3 grid, with a unit square removed. Now, it has an even number of unit squares. Is it tileable with 2 × 1 tiles?
Solution:
A 5 × 3 grid has 15 unit squares. Removing 1 square leaves 14 unit squares (which is even).
However, even though the number of squares is even, the grid may not be tileable depending on which square is removed.
But the figure shown above is tileable by 2 × 1 grid.
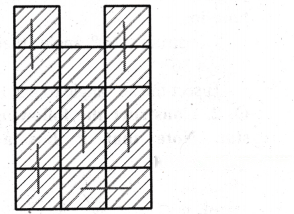
Question 4.
Is the following region tileable with 2 × 1 tiles?
Solution:
Yes, it is tileable, as it is shown in the figure below.

Page 159
Question 1.
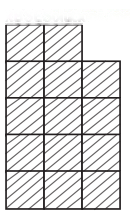
What about this one?
Solution:
No, it is not tileable with 2 × 1 grid as shown in the figure below.
Question 2.
Were you able to tile this? How can we be sure that this is not tileable? Can you find another unit square that, when removed from a 5 × 3 grid, makes it non- tileable?
Solution:
No, the above arrangement of tiles cannot be tiled by 2 × 1 grid. We can try out various arrangement to be sure that we cannot tile it.
If we remove a left most unit square from 5 × 3 grid, it will be tileable.
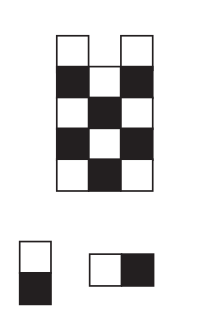
Question 3.
If the plain grid is tileable, is the black-and-white-grid tileable?
Solution:
Yes, if the plain grid can be tiled, the corresponding black-and-white grid can also be tiled.
Question 4.
If the black-and-white grid is tileable, is the plain grid tileable?
Solution:
Yes, if the black-and-white grid can be tiled, the plain grid can also be tiled.
Page 160
Question 1.
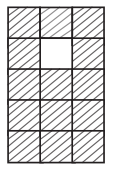
Is the black-and-white region in Fig. tileable?
Solution:
Any region tiled with black-and- white-tiles must have an equal number of black tiles and white tiles.
Since the black-and-white region in Fig. has 8 white squares and 6 black squares, it can never be tiled with these tiles.
Question 2.
Use this idea to find another unit square that, when removed from a 5 × 3 grid, makes it non-tileable?
Solution:
In a 5 × 3 grid with a chessboard colouring, there are 8 squares of one colour and 7 squares of the other colour.
If we remove a square of the colour that has 8 squares, we get 7 squares of each colour, and the grid can be tiled.
If we remove a square of the colour that has 7 squares, we get 8 squares of one colour and 6 squares of the other, and the grid cannot be tiled.
Class 7 Maths Constructions and Tilings Solutions
Figure it Out (Page 140)
Question 1.
When constructing the perpendicular bisector, is it necessary to have the same radius for the arcs above and below XY? Explore this through construction, and then justify your answer.
[Hint 1: Any point that is of the same distance from X and Y lies on the perpendicular bisector.
[Hint 2 : We can draw the whole line if any two of its points are known ]
Solution:
No, it is not necessary to have the same radius for arcs above and below XY. As long as the arcs from X and Y above XY intersect at a point A, and the arcs from X and Y below XY intersect at a point B, both A and B will be equidistant from X and Y, and thus lie on the perpendicular bisector.
Do construction yourself.
Question 2.
Is it necessary to construct the pairs of arcs above and below XY?
Instead, can we construct both the pairs of arcs on the same side of XY? Explore this through construction, and then justify your answer.
Solution:
It is not necessary to draw arcs on both sides of XY.
We can draw two pairs of intersecting arcs on the same side of XY using the same radius from X and Y.
Each intersection point is equidistant from X and Y, so both points lie on the perpendicular bisector. Since, a straight line can be drawn using any two points, joining these two points gives the perpendicular bisector of XY.
Question 3.
While constructing one pair of intersecting arcs, is it necessary that we use the same radii for both of them? Explore this through construction, and then justify your answer.
Solution:
Yes, it is necessary to use the same radii for both arcs (from X and Y) to ensure that the point of intersection is equidistant from X and Y.
Question 4.
Recreate this design using only a ruler and compass-
Solution:
Do construction by yourself.
Use the construction methods you have learned—such as perpendicular bisectors, angle bisectors, and arcs—to recreate the design. After completing it, trace the outer boundary with a ruler or compass using a coloured pencil to highlight the design and distinguish it from the construction lines.
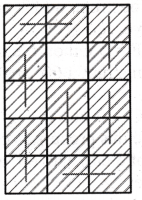
Figure it Out (Page 142)
Question 1.
Justify why AB in the following figure is the perpendicular bisector.
Solution:
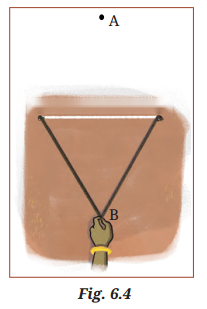
When the rope is folded in half and stretched with loops at X and Y, the midpoint of the rope is equidistant from X and Y.
Both points A and B (above and below) are equidistant from X and Y.
Therefore, joining A and B gives the perpendicular bisector of XY.
Question 2.
Can you think of different methods to construct a 90° angle at a given point on a line using a rope?
Solution:
Use the same rope method as above to find the perpendicular bisector, which will form a 90° angle at the given point.
Figure it Out (Pages 144-145 )
Question 1.
Construct at least 4 different angles. Draw their bisectors.
Solution:
One image is shown below. Similar can be constructed.
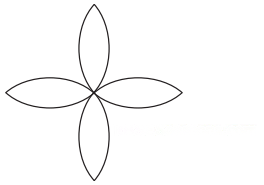
Question 2.
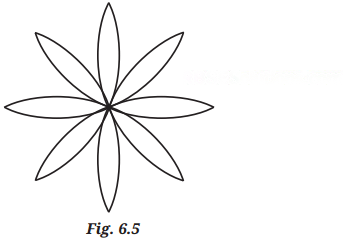
Construct the 8-petalled figure shown in the following figure.
Solution :
- Start by constructing a 90° angle at a point.
- Bisect it to get 45° angles.
- Construct another 90° angle perpendicular * to the first, then bisect each to create 8 equal angles of 45° each.
- Draw arcs from the center to create the 8-petalled design.Do construction by yourself.
Question 3.
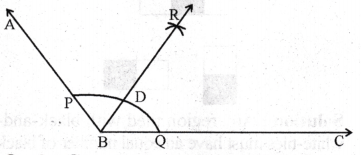
In Step 2 of angle bisection, if arcs of equal radius are drawn on the other side, as shown in the figure, will the line OC still be an angle bisector? Explore this through construction, and then justify your answer.
Solution:
Yes, the line OC will still be an angle bisector.
The point C will still be equidistant from A and B, ensuring that ∆OAC ≅ ∆OBC, so OC bisects the angle.
So, 180° – equal angle will also give equal angles.
Question 4.
What are the other angles that can be constructed using angle bisection? Can you construct 65.5° angle?
Solution:
Using angle bisection, we can construct angles like 45°, 22.5°, 11.25°, etc. (by successive bisections of 90°).
We can construct 60° (using an equilateral triangle), then bisect to get 30°, 15°, 7.5°, etc.
To construct 65.5°, we would need to construct 60°, + 5.5°, but 5.5° cannot be constructed exactly using ruler and compass alone, so 65.5° cannot be constructed.
Question 5.
Come up with a method to construct the angle bisector using a rope.
Solution:
- Mark two points A and B at equal distances from the vertex O on the two arms of the angle.
- Use a rope with a fixed length to find a point C that is equidistant from A and B (similar to perpendicular bisector method).
- Join O and C to get the angle bisector.
Question 6.
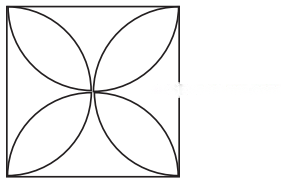
Construct the following figure.
How do we construct the petals so that they are of the maximum possible size within a given square?
Solution:
- Draw a square.
- Draw arcs from each comer of the square with radius equal to half the side of the square.
- The arcs will form petals that touch the midpoints of the sides, creating the maximum possible size.
Figure it Out (Page 147)
Question 1.
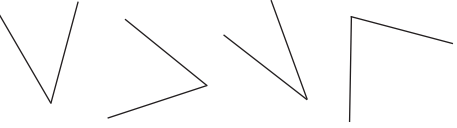
Construct at least 4 different angles in different orientations without taking any measurement. Make a copy of all these angles.
Solution:
Do it yourself
Question 2.
Construct the following figure.
Solution:
Do it yourself
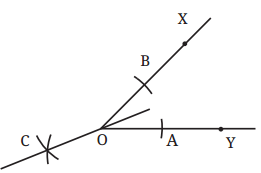
Figure it Out (Page 148)
Question 1.
Construct 4 pairs of parallel lines in different orientations.
Solution:
Do it yourself.
Question 2.
Construct the following figure.
Solution:
Use the construction of parallel lines and copying angles to recreate the given geometric figure.
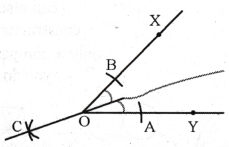
Figure it Out (Page 151)
Question 1.
Use support lines in the following figure to construct a pointed arch. Make different arches, by changing the radius of the arcs.
Solution:
Change the radius and draw different arcs, do it yourself.
Question 2.
Make your own arch designs.
Solution:
Create your own arch designs using geometric constructions taught above.
Figure it Out (Pages 154-155)
Question 1.
Construct the following figures :
Solution:
All the figures shown above can be made by taking the help of a ruler and a compass.
Question 2.
Optical Illusion : Do you notice anything interesting about the following figure? How does this happen? Recreate this in your notebook.
Solution:
Optical illusions often use patterns, angles and symmetry to create visual effects. We can see a triangle inside a triangle in this figure.
Recreate the figure by carefully following the construction steps and observing the patterns.
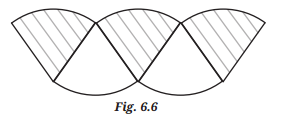
Question 3.
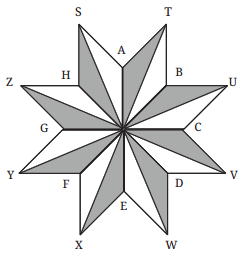
Construct this figure.
[Hint : Find the angles in this figure ]
Solution:
Analyze the angles in the figure (likely multiples of 60°, 90°, or 45°).
Use angle construction and bisection methods to recreate the figure.
Question 4.
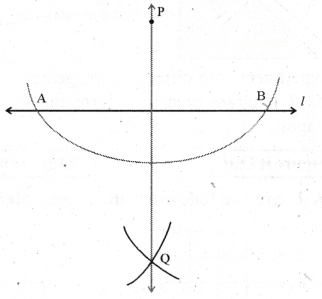
Draw a line l and mark a point P anywhere outside the line. Construct a perpendicular to the given line l through P.
[Hint : Find a line segment on / whose perpendicular bisector passes through P ]
Solution:
- From point P, draw two arcs with the same radius that intersect line l at two points, say A and B.
- P is equidistant from A and B.
- Find another point Q (on the opposite side of l from P) that is also equidistant from A and B.
- Join P and Q. The line PQ is the perpendicular bisector of AB and is perpendicular to l.
Figure it Out (Page 156)
Question 1.
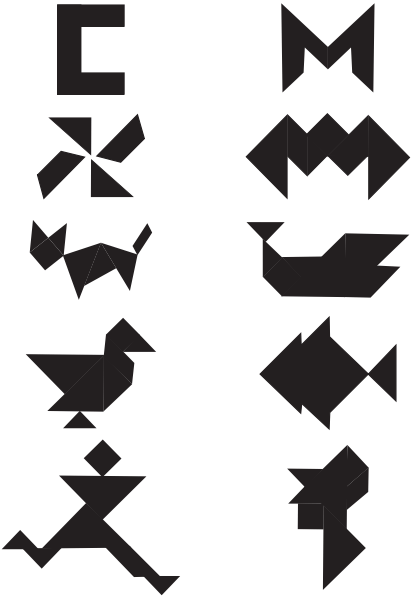
How can the tangram pieces be rearranged to form each of the following figures?
Solution:
Various shapes can be made through tangram pieces.
No. 1 and 2 : Large right triangles
No. 3 : Parallelogram
No. 4 and 5 : Small right triangles
No. 6 : Square
No. 7 : Medium right triangle
Experiment with different arrangements of the 7 tangram pieces to form the given shapes.
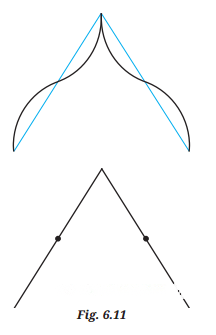
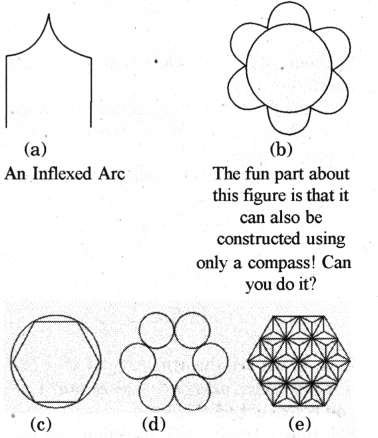
Figure it Out (Page 160)
Question 1.
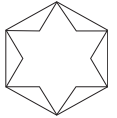
Are the following tilings possible?
Solution:
Yes, it can be tiled as shown.

Question 2.
Solution:
No it cannot be tiled.
Analyze the specific configuration and use logical reasoning or the black-and-white method to determine if tiling is possible.